Cards - General, Photopolymer

3 Thank You’s

I had a play with the SaleABrations Stamp set What I Love and this is what I came up with. The stripe paper is from the Its My Party DSP Paper Stack and I added stems with my Mint Macaron Marker!

P1060170

P1060171

I only used 2 of the 3 step stamp flower and one ink colour on each card. The outline is full strength and the petal fill in was stamped off onto scrap paper first then onto the card. This one was Tangelo Twist.

P1060173

And then Tempting Turquoise……

P1060172

Lastly Elegant Eggplant with the addition of some pearls!

what I love

Big Shot, Cards - General, Photopolymer

Build A Birthday Brick Wall

This one doesnt in the least resemble a birthday cake but it is also made using Build A Birthday. I used a few shades of yellow and brown; Delightful Dijon, Hello Honey, So Saffron, Tip Top Taupe and Soft Suede. The card base is Delightful Dijon and the stars So Saffron. This candle stamp reminded me of breeze block or bricks so I stamped it like that.

P1040885

I used my star framelits to add some interest and a peek-a-boo window through to the inside of the card. And of course stars scream for some blink! I added some gold sequins and with the leftover “string” from my sequin roll I added the knot on the star. Waste not, want not.

P1040887

Photopolymer, Technique

Photopolymer Amazing Trick

Hi folks I just watched this video by Connie Stewart where she shared this awesome tip about photopolymer stamps. PRESTAIN! Yes – Prestain – it will save your stamps from staining so badly with our darker, stronger coloured inks. Just pick a pale colour to use with your stamp for its first stamping and it will stain THAT colour and any inks after that will clean off much better. SO clever!

Here is the link to the You Tube video 

Christmas, OTP Off the page, Photopolymer

Christmas Blog hop


Creative_Inkers_Blog_Header

Hi folks better late than never. Apologies I was a little late getting my post up but I hope its worth the wait. I hope you enjoyed Rachels project those stars are pretty cool!

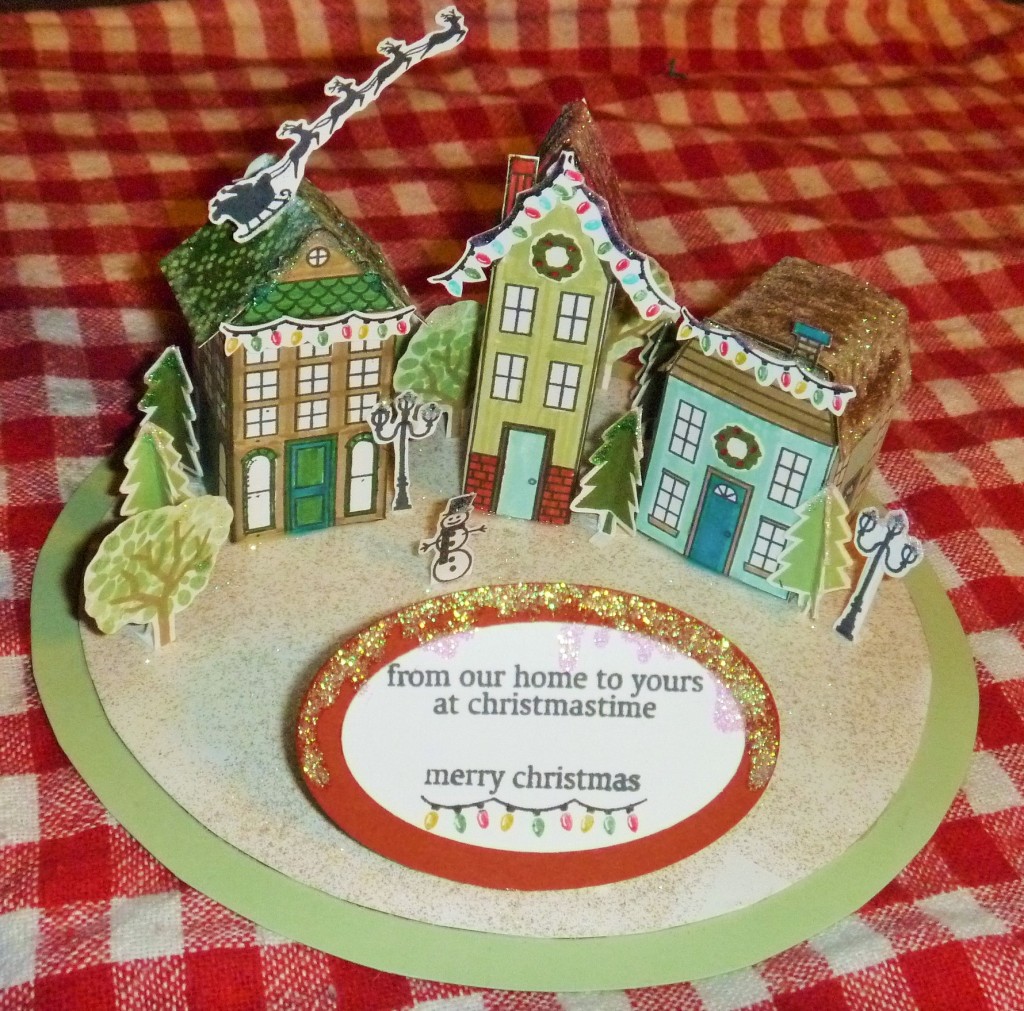
Todays creation is a wee Christmas Village scene made using the Holiday Home stamp set. One of the joys of Photopolymer stamps is that you can SEE exactly where your stamping so it was easy to stamp 4 houses in a line beside each other to create these 3 D houses. I have to say it took lots of fiddly cutting and folding to make those trees, the tiny wreaths and the christmas lights etc.

P1020948

P1020949

And a view from above

P1020950

And next you can hop on over to Paula’s post.

Blog Hop Next Button                 Blog Hop Back Button

Just in case you get lost here is the whole hop chain

1. Narelle Hoggard
2. Jackie Noble

3. Bev Poultney

4. Sally Williams

5. Bernice Collins

6. Irene Wardlaw

7. Sharon de Vos

8. Jacque Williams

9. Delys Cram

10. Rachael Knight

11. Lisa Bullock – YOU ARE HERE

12. Paula Reid

13. Heather Stewart

14. Ria Kaire

15. Kathryn Tyrrell

16. Kathe Oldham


Cards - Birthday, Cards - General, Photopolymer

Photopolymer all the way

Hi folks I had another play with my new Photopolymer (man! they could have named them something shorter than that!) stamp set Show and Tell One and created a completely (except for the letters) PP (there thats shorter) Card right down to the funky patterned background.

P1020604

They banner border was easy peasy as you can see right through the stamp, same with when I added the arrow heads ( the wonky ones are my fault not the stamps : O )

As I mentioned in the last post I had a problem getting a good image from the Dance with Me Pennant stamp with the new style juicy ink pads. After some advice from those in the know and some more experimenting I can get it pretty good each time. Here were some of my first attempts, the wisteria is old style pad and olive new style

P1020616

So how did I do it. Well it helps if you have the right surface under your work, A phone book, a Stampin’ Pierce Pad, something like that. Solid but with a bit of give. Then the trick is to hold the stamp and the ink pad up and ink it in the air. I tell my ladies, with the old style pads use Kangaroo Hops ( 2 or 3 firm jumps) with the new style pads its Bunny Hops (2 lighter bounces) but when inking Photopolymers (especially those with fine line detail) its BABY KISSES! P1020617

Here are my end results now Wasabi Old style at the top and Espresso New Style at the bottom. Not a lot of difference eh! I was pretty pleased with that. So, my friends, ink them in the air with the gentlest of BABY KISSES from the pad then press onto card firmly. You can see the ink transferring to the card and may need to add pressure to spots where it hasnt quite transferred. Give it a go and let me know how you get on. Feel free to add a link to your samples in the comments section of this post. Remember if you buy both Show and Tell One AND TWO you recieve a FREE online class on how use Photoploymer stamps


Cards - Babies and Kids, Cards - Birthday, Photopolymer, Technique

Old and new unite – Photopolymer

I pulled out a very old set to stamp this card. I have actually had this image all coloured up sitting on my desk waiting for inspiration for some time and when my new Photopolmer stamp set Show and Tell One arrived the planets aligned!

P1020603

The Dance with me sentiment was just what I needed but I had an awful job trying to get a good image from it using the new style ink pads so ended up using one of the old style ones and bingo there it was. The great thing about Photopolymer stamps is you can shape them. I did this for the banner string, curving the stamp onto the block instead of leaving it straight.

So my impressions so far of the Photopolymer stamps:

They can be shaped

Really firm hold on the blocks and if they lose their sticky then just wash in warm lightly soapywater to get it back.

Also being that they are good solid stamps Iwas worried you would have to tug them off the sheet ( I have had some clear stamp sets that have been so hard to get off the storage sheet that I was worried they would rip or stretch) but they peeled nicely

They are a bit stinky when you first get them out

You need to give them a good clean (season them) before use. this gets rid of any release agents still on them from the molding process

Lots in the pack and quite a few smaller images which are great for gap filling or pattern making (see tomorrows post) $28.95 for 24 images

They are solid stamps, some other brands I have used have been quite squishy but you still get quite a nice crsi clean image from our ones.

They do only come in a cellophane type packet but I have heard that any released after the new catalogue will be in our clearmount cases.

Must clean up fairly quickly to avoid staining and with a CLEAN Stampin’ Scrub (Shame on me it wasnt clean and now I have stained my stamp : (

You can use them with StazOn ink and use the Staz On cleaner BUT you must make sure EVERY drip of the cleaner is removed. My plan is to give them a wee rinse in the warm water afterwards.

I was disappointed that the hexagon stamp and banner stamps didnt fit our punches but then I remembered this set has been out in the States for longer than we have had the punches

So all in all a good investment and I hope to see more of these available to us